Spider Truffles
Sink your teeth into these creepy-crawly Spider Truffles—rich chocolate bites with a spooky crunch! These little monsters are equal parts adorable and eerie, making them perfect for Halloween trays, party favors, or a scary-good surprise in any lunchbox. Whether you’re hosting a Halloween bash or simply want to delight your family, these Spider Truffles will steal the show.
Why You’ll Love This Recipe
- Easy to Make: With just a few simple steps, you can whip up these delightful treats in no time.
- Perfect for Any Occasion: Ideal for Halloween parties, school events, or just a fun snack at home.
- Customizable Design: Get creative with decorations! Use different candies for unique looks.
- Kid-Friendly: Fun to make with children; they can help assemble the truffles!
- Delicious Flavor: The combination of chocolate and cream cheese creates a rich, creamy bite that everyone loves.
Tools and Preparation
Before diving into making Spider Truffles, gather your essential tools. Having everything ready will streamline the process and ensure you don’t miss a step.
Essential Tools and Equipment
- Food processor
- Mixing bowl
- Baking tray
- Parchment paper
- Microwave-safe bowl
Importance of Each Tool
- Food processor: Makes quick work of crushing cookies into fine crumbs for a smooth texture.
- Mixing bowl: Necessary for combining ingredients efficiently without mess.
- Baking tray: Provides a sturdy surface to chill the truffles before coating them in chocolate.

Ingredients
To create these delightful Spider Truffles, you’ll need the following ingredients:
For the Truffles
- 1 package (about 9 oz) chocolate sandwich cookies (like Oreos)
- 4 oz cream cheese, softened
- 1 cup dark chocolate chips or candy melts (for coating)
- Pretzel sticks (for legs)
- Candy eyes
How to Make Spider Truffles
Creating these spooky treats is both fun and easy! Follow these steps carefully for perfect results.
Step 1: Prepare the Cookie Mixture
- Crush the cookies into fine crumbs using a food processor or rolling pin until they resemble sand.
- In a mixing bowl, combine the cookie crumbs with softened cream cheese. Mix until a thick dough forms.
Step 2: Shape the Truffles
- Roll the mixture into small balls about one inch in diameter.
- Place each ball on a lined baking tray and chill in the refrigerator for 15–20 minutes to firm up.
Step 3: Coat with Chocolate
- In a microwave-safe bowl, melt the dark chocolate chips or candy melts according to package instructions until smooth.
- Dip each chilled truffle into the melted chocolate until fully coated.
Step 4: Add Legs and Eyes
- While the chocolate coating is still wet, insert 3–4 pretzel halves on each side of the truffle for spider legs.
- Place candy eyes on top of each truffle before the chocolate sets completely.
Let your spooky creations sit at room temperature or refrigerate until fully set before serving! Enjoy these delightful Spider Truffles at your next gathering or as an unexpected treat!
How to Serve Spider Truffles
These deliciously spooky Spider Truffles are perfect for various occasions and can be served in fun and creative ways. Here are some exciting serving suggestions to impress your guests or delight your family.
On a Halloween Dessert Table
- Arrange the truffles on a tiered dessert stand for an eye-catching display.
- Use black or orange cupcake liners to give them a festive touch.
As Party Favors
- Place each truffle in a small clear bag tied with a colorful ribbon.
- Include a spooky tag with fun facts about spiders to add an educational twist.
In Lunchboxes
- Pack two or three truffles for a sweet surprise in school lunches.
- Pair with fruit like apple slices or grapes for a balanced treat.
At Movie Nights
- Serve these truffles alongside popcorn and candy for a fun movie marathon.
- Create a themed snack bar with creepy decorations to enhance the experience.
How to Perfect Spider Truffles
To make sure your Spider Truffles turn out perfectly every time, keep these helpful tips in mind.
- Use fresh cream cheese: Fresh cream cheese ensures your dough is smooth and creamy, making it easier to roll into balls.
- Chill before dipping: Chilling the rolled truffles helps them hold their shape when dipped in melted chocolate.
- Melt chocolate carefully: Use short bursts of heat in the microwave to avoid burning the chocolate. Stir until smooth.
- Create leg positions: Experiment with how you insert pretzel legs for different looks—some can be bent at angles for added character!
- Add extra decorations: Feel free to sprinkle edible glitter or colored sugar on top before the chocolate sets for an extra festive touch.
Best Side Dishes for Spider Truffles
Pairing side dishes with your Spider Truffles can elevate your dessert table. Here are some great options that complement the flavors and theme of your treats.
- Ghostly Fruit Salad: A mix of spooky-shaped fruits like ghost-shaped watermelon, strawberries, and blueberries adds freshness.
- Witch’s Brew Punch: A fruity punch made with apple juice, sparkling water, and gummy worms creates a fun drink option.
- Creepy Veggie Platter: Arrange cut vegetables like cucumber sticks and bell peppers alongside hummus dressed as witches’ dip.
- Spider Web Pizza: Make mini pizzas using tortillas topped with cheese and olives arranged like spider webs.
- Monster Munch Snack Mix: Combine popcorn, pretzels, and candy corn for a crunchy, sweet snack that everyone will love.
- Chocolate-Dipped Pretzels: These treats echo the flavors of the truffles while adding crunch and variety to your spread.
Common Mistakes to Avoid
Making Spider Truffles can be a delightful experience, but there are a few common pitfalls to watch out for. Here are some mistakes that can affect your spooky treats.
- Skipping the chilling step: Not chilling the truffle mixture before coating can lead to misshapen balls. Always chill for 15-20 minutes to ensure they hold their shape.
- Using warm chocolate: Dipping the truffles in hot chocolate can cause them to melt. Let your melted chocolate cool slightly before dipping.
- Uneven coating: Failing to coat the truffles evenly can impact appearance and taste. Ensure each truffle is completely submerged for an even layer.
- Overloading on legs: Adding too many pretzel legs can make the truffles difficult to handle. Stick with 3-4 pretzels per side for balance.
- Neglecting decoration: Forgetting to add candy eyes can make your Spider Truffles less spooky. Be sure to add them right after dipping while the chocolate is still wet.

Storage & Reheating Instructions
Refrigerator Storage
- Store in an airtight container in the fridge.
- Best consumed within one week for optimal freshness.
Freezing Spider Truffles
- Freeze in an airtight container or freezer-safe bag.
- Can be stored for up to three months—just remember to thaw in the refrigerator before serving.
Reheating Spider Truffles
- Oven: Preheat oven to 300°F (150°C) and warm on a baking sheet for about 5 minutes.
- Microwave: Heat on low power in short bursts of 10-15 seconds until just warm; avoid overheating.
- Stovetop: Place in a covered pan over low heat, stirring occasionally, until warmed through.
Frequently Asked Questions
What are Spider Truffles?
Spider Truffles are rich chocolate treats shaped into small balls, decorated with pretzel legs and candy eyes, perfect for Halloween.
Can I customize my Spider Truffles?
Yes! You can mix in different flavors like peanut butter or add toppings such as sprinkles or crushed nuts for extra crunch.
How do I achieve a smooth chocolate coating?
Make sure your chocolate is melted slowly and thoroughly. Using a fork helps when dipping, allowing excess chocolate to drip off easily.
How long do Spider Truffles last?
Stored properly in the fridge, they can last up to one week, while frozen ones remain good for about three months.
Final Thoughts
Spider Truffles are not only fun and spooky but also incredibly versatile. You can personalize them with various flavors and toppings, making them perfect for any occasion. Try these delicious treats at your next gathering or surprise someone special!
Spider Truffles
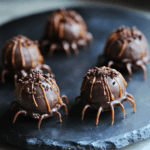
Sink your teeth into the delightful world of Spider Truffles! These rich chocolate bites, adorned with pretzel legs and candy eyes, perfectly blend adorable and eerie, making them an instant hit for Halloween festivities or a fun treat for any day. Easy to create and endlessly customizable, these truffles are a fantastic way to engage kids in the kitchen while whipping up spooky delights. With a creamy chocolate and cream cheese base, every bite offers a delectable experience sure to charm family and friends alike.
- Prep Time: 20 minutes
- Cook Time: 0 minutes
- Total Time: 20 minutes
- Yield: Approximately 20 servings 1x
- Category: Dessert
- Method: No-bake
- Cuisine: American
Ingredients
- 1 package (about 9 oz) chocolate sandwich cookies (like Oreos)
- 4 oz cream cheese, softened
- 1 cup dark chocolate chips or candy melts (for coating)
- Pretzel sticks (for legs)
- Candy eyes
Instructions
- Use a food processor to crush the chocolate cookies into fine crumbs.
- In a mixing bowl, combine the cookie crumbs with softened cream cheese until well mixed.
- Form small balls (about 1 inch in diameter) from the mixture and chill on a lined baking tray for 15-20 minutes.
- Melt the dark chocolate chips in a microwave-safe bowl until smooth. Dip each chilled truffle in the melted chocolate until fully coated.
- While the chocolate is still wet, insert pretzel halves for legs and place candy eyes on top before the coating sets.
Nutrition
- Serving Size: 1 serving
- Calories: 115
- Sugar: 8g
- Sodium: 50mg
- Fat: 6g
- Saturated Fat: 3g
- Unsaturated Fat: 3g
- Trans Fat: 0g
- Carbohydrates: 13g
- Fiber: 1g
- Protein: 1g
- Cholesterol: 10mg